DenKnits began when I decided that I was ready to share my knitting with others. I'd already established myself as denmoma so DenKnits was the perfect fit. I was happy to do occasional commission knits and sell some of my finished objects. Many of the items I knit weren't from specific patterns but creations I came up with following stitch patterns. That led me to trying my hand at writing up patterns.
Eventually I got to the point where I felt I could call myself a knit wear designer and I'm pleased to have over 40 designs under my belt at this time. With each of those designs I've learned something, from using test knitters to using a tech editor to the challenge of scaling sizes. After the work I put into my latest design, the first of it's kind for me, I really started putting some thought into my direction. I've done many different types of patterns and now know what I can excel in and what's better left for the experts. Designing will still be something I continue to do, however I want to do what I do best.
My designing has also been slowing down as I picked up other fiber crafts. With each new craft, I get this sense of wanting to share what I've found or what I've created. This is usually done in a rather rushed manner without much of long term plan or goal. I'm also not the best at 'shameless self promotion' and as a result I've never gotten very far. Having learned by trial and error with my designing as well as with these shop attempts, I was ready to get focused and make plans before jumping in.
So, PLANS. Designs, handspun & handmade yarns and batts to put it briefly. Let's delve in a bit further, shall we?
Designing. As I mentioned above, this is still a part of the plan, however I don't want to limit myself to knitting only. After learning to crochet almost 4 years ago I didn't think I'd understand it the way I do knitting. While that does still ring true to some extent, I feel like I've gotten a good understanding of the basics and could see writing up some simple crochet patterns in the future.
Handspun. When I started spinning, there was no turning back. After participating in the Michigan Fiber Festival handspun skein competitions for a couple years & receiving blue ribbons, I felt comfortable selling my handspun when an LYS put out a call. That has been fairly successful and has given me the confidence to aim at selling the handspun myself as well.
Handmade yarns. This train of thought actually came after the batts, however it fits better here. I've been collecting old t-shirts for years knowing I could make t-shirt yarn with them. I have cut the yarn in the past and crocheted a little rug. The more I thought about t-shirt yarn, the more it seemed to fit since it's already in a variety of colors and it's a unique yarn that could likely use some patterns designed for it.
Batts. As fun as spinning is, I continued to be drawn to working more with the fiber myself before the spinning. Fiber prep also became very important to me as I continue to struggle with wrist issues. Having to split and pre-draft slows me down but having a fiber that spins smoothly without a lot of tugging is essential to being able to keep spinning. Since batts are somewhat combed as they are prepped I decided to finally take the plunge and buy a drum carder. My Christmas gift to myself was a Baby Brother drum carder. And because I can't help but share, I started plans to sell batts. This might sound odd, but even with all these plans, I have no desire to start dying. My batts will be made up of pre dyed fibers, some more commercial than others, that I can combine to share my color palettes, my love of locks and highlight indie dyers I find along the way. I am also interested in making batts out of unusual breeds in their natural colors, making them more accessible to others.
Now that I've gotten products narrowed down I knew a name change was necessary. DenKnits just doesn't cover it all and could give someone a limited impression of all that I'm trying to do. After toying with options ranging from a complete name change to no change I decided on a subtle change. I want to go forward as DenKnits and... This leaves me open to many possibilities yet keeps the name recognition.
Writing all about this is the first real step. My current path takes me to a booth at a local event in November. Along this path I want to get my batts and tshirt yarns out into the wild for some testing. I'll be on the look out for spinners of any experience soon, who would be willing to test spin my batts and provide feedback at a significant discount on the product. Keep a lookout on the blog and on my Instagram denknitsand

Sunday, February 18, 2018
Tuesday, November 28, 2017
Indie Designer Gift-a-long 2017 - New Fav Designer
Guess what? I can't pick just one :-D Over the course of looking through all the designs available in the Indie Gift-a-long, I ended up favoriting 8 designers! These are not necessarily my favorites to actually make, but they just have some amazing designs. In no particular order, check out these knit and crochet designers...
 Irina Tarasova has designs for THE MOST ADORABLE bunny and outfits! This bunny is pretty cute, but the outfits really knock it out of the park. I think my fav would be Set in Boho Style (pictured left). The patterns appear to combine knitting and crochet so be sure you know both!
  This is one that I'm just admiring, I haven't made or purchased anything. That being said, these are pricey patterns that appear to be very detailed according to the description. I did see some comments from a buyer that it was not all they expected but there are also some very happy bunny's!
Elizabeth Felgate had a few knit designs that caught my eye... but this hat, Hick City, is one I've looked at again and again. It's perfectly slouchy and lose which I like for my curly hair. We must not overlook some other designs she has that are ingenious! The Gaugeless Sweater, Gaugeless Lady Cardigan and Gaugeless Cardigan 2. The name may give them away, but you can make any of these with any yarn and needle combination with no gauge calculation required. I really like the stitch used for the shoulders and arms on the Gaugeless Sweater. The Gaugeless Lady Cardigan has a bit of a shawl look from the back, with three increase eyelets sections running down it, while the Gaugeless Cardigan 2 has a more traditional cardi look.

Up next, Nim Teasdale who caught my eye with her gorgeous lace shawls. I'm not much for lace knitting these days but some day I'd love to make one! I think the The Peacock's Tale is the one I'd go for and the gradient yarn used is the perfect effect.

Emily Ross is not really new to me, not that I actually knew that to start with... she is the designer behind the Haruni Shawl, a free pattern that has over 10,000 projects! She has a bunch of other knit lace shawl designs that are beautiful, as well as many Haruni inspired patterns. While I really love all the shawls, my favorite is probably the Haruni Cowl for its easy wearability.
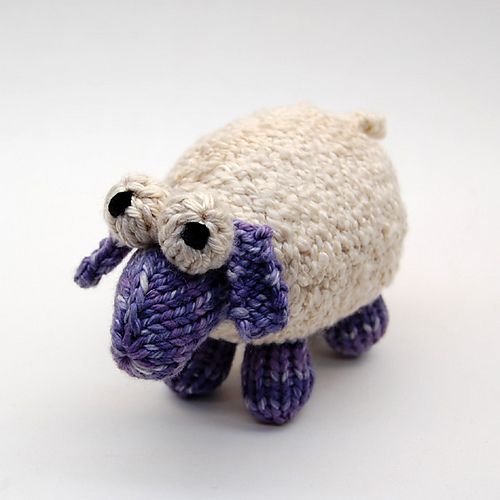 While little toys look easy to make and I'm always drawn to them... I know they're fiddly and usually don't end up making many. That doesn't mean I can't admire the designs by cheezombie. There are knit and crochet items which is nice, as I am more likely to try a crochet toy. My favorite though, is a little knit sheep, the Sheepish Toy Pattern.
  Crochet peacock items? Yes please! Look no further than Christa Veenstra. There is an amazing array of different things with different style peacock 'feathers' such as a stool cover or bookmark. I'm hard pressed to find a favorite among these, but if I had to pick one I'd go with Peacock Feather Motif Art Nouveau mostly because I love the color scheme used on the pattern page.
  Kari-Helene Rane has some real fashionable designs, which would make sense as she is a fashion designer. You get a real sense of her style looking through her designs. She has a range of knit accessories and garments for adults and children. While it would be a commitment at 1500-2200 yards of sport weight yarn, the Maddie Dress is simple yet effective.
 Another designer that I didn't know I knew, because often times designs are popular by their name and the designer gets lost, Mary Annarella is the designer behind Shleeves and Stranger Things Cowl. Those are great representations of the knit designs she tends to create, garments and colorwork. While I do like those two items, I'm more drawn towards the Funicular. This hat seems a great way to do some simple colorwork and short rows, just think of all the color combos!
Have you made anything from these designers? Or maybe you just discovered them too? Have you found some new favorite designers too?
Sunday, November 26, 2017
Indie Designer Gift-a-long 2017 - Foot & Leg Things
When it comes to this category, I don't have much to contribute... almost all of my socks are plain vanilla, no patterns for me! I did manage to find four designs that were worth favoriting for my purposes.
My very favorite (and already on the needles!) are the Thrumbelina aran weight knit slippers. These slippers also use roving, to make thrumbs. I've never done this technique before but these slippers would be perfect for gifts. There are plans to make FIVE pairs, but to be sure I understood the technique, I started the pair for myself. These should be a quick knit, but making thrumbs is a little tricky. I think they'd make a good PT exercise for those with wrist problems (yeh, like me). So my plan is to make as many thrumbs as I can manage and then knit with those until I run out. Back and forth should give my wrists a break from monotony.
Another fun and quick slipper pattern, Strange Jewels Slippers are knit up with super bulky weight yarn. These also don't use much yardage and might be nice for handspun.
The deep roots leg warmers are knit up with worsted weight yarn. Utilizing just knits and purls, you can create these cozy leg warmers or boot cuffs. I love the idea of making them long enough for leg warmers but still wearing them under boots and folding the cuff down.
A more traditional boot cuff, in my mind, should have a little lace. The Old English Lace Boot Cuffs are perfect. They are knit up with fingering weight weight yarn, but boot cuffs in any yarn weight can be a quick knit!
Have you found some neat Foot & Leg Things? Share, share share! And if you're making any, be sure to pop onto the Foot & Leg Things thread and tell about it.
Friday, November 24, 2017
Indie Designer Gift-a-long 2017 - Scarves!
Another potential gift I've got on my mind is a scarf. It could also be a shawl, but for today we'll focus on scarves. Something easy to wear and of course, the quicker I can finish it, the better!
So lets start with some of the quicker possibilities and focus on worsted weight scarves. The Samara Scarf is a crochet pattern that actually utilizes a skein of worsted weight as well as a skein of fingering weight yarn. Worked up on the bias alternating the skeins gives the body of the scarf a cool affect with a fun stitch pattern on the edges for added interest. Another scarf that has one stitch pattern for the body and a different on the edges is the Cloud Covered Scarf. This one is mostly lace with garter stitch on the edges and looks so warm and cozy in the pattern page photos! Not exactly a scarf, the Impari Shawlette would still be a quick knit. I especially like the feature of 2 different ties that can be incorporated on the shawlette making it super wearable!
There was one mid-weight yarn design that I found may fit the bill. The sport weight Duara has a similar theme of using two different stitch patterns. This one begins with a short bit of rib, followed by a flower motif, back to a bit of rib, flower motif and finally the short rib section. The styling in the feature photo is just marvelous!
And as crazy as a fingering weight scarf may seem when we're in a time crunch, I found plenty of options in this category as well. The crochet scarf Prelude uses under 200yds so it's still fairly quick. It's mostly a fairly simple stitch with short row borders that result in a softly curved edge. The Phoenix Feather scarf is a gorgeous scarf that is worked up in two halves and seamed together. I have to keep checking because the lace is so unique, this is definitely a knit pattern! A reversible scarf with a mix of different stitch patterns, Interlacing Scarf is knit on the bias. Another design that caught my eye because of the styling in the photos, I really love the tied look of the 5th image! While you could theoretically add fringe to any scarf, the Crooked River Scarf makes my list because the fringe, among other things. The way the dropped stitches are worked in a rib like manner make for a cozy scarf that isn't too hot. For a delicate looking scarf, check out the Frideswide. This would work beautifully with a monotone indie dyed yarn and it features a reversible cable edging and ruffle!
There are a few scarves that I think deserve 'honorable mention'. They don't exactly fit the bill for my recipient, but might be a good selfish knitting item or it's just so interesting I have to share...
The Clincher was originally a knit design, but since has been released for crochet as well! This might be an ordinary fingering weight triangle shawlette, except for the added feature along the one edge (icord I believe?) that makes wearing the shawlette that much easier. It's so hard to explain, so go on and click the link to see it! The Art Deco Beaded Scarf looks like a fairly simple knit scarf but the addition of beads make it so classy! This DK weight scarf is gorgeous and reversible. I'm a sucker for crocheted flowers and this scarf just calls my name! The Floral Whisper Scarf could easily be a cowl and should finish quickly with worsted weight yarn. Always on the lookout for patterns good for bulky handspun, the Brioche Stitch Infinity Scarf looks like a simple knit with beautiful results! Did I mention loving crochet flowers? Well, not exactly flowers but still right up my alley, the Myrtle Crochet Scarf is made up of circular motifs and could be a great way to use up fingering weight scraps! Another uniquely shaped scarf, the Spring Runoff Scarf utilizes short rows to give it the shawl like sections that add up to a stunning scarf knit fairly quick with sport weight yarn.
What do you think? Any scarves here that would work for your gifts? If you end up making one, be sure to join the a-long for Cowls, Scarves and Other Neck Things.
Wednesday, November 22, 2017
Indie Designer Gift-a-long 2017 - Hats!
While this event is in it's 5th year, this is my first year participating as a designer. The Indie Gift-a-long is a great way to prepare for the holidays! You'll find all the info you need on the Ravelry board and there are a bunch of other threads you'll want to check out also depending on how you want to participate. I'll let you explore the Ravelry group to get all the details so I can share with you some of my favorite finds!
I was able to browse the participating designers thread a little early and ended up with over 400 favorite designs! There's likely not enough time for all those so I need to narrow down who I can gift knit/crochet for. Then I organize that list based on who I want to gift most and then I'll start making and see how many I can get to!
One of my must makes is a hat for DH. He saw a brioche hat I made myself and was impressed. So I decided I must find a good brioche hat that is masculine and not too fancy. My pick is Autumn Vibes! I've followed Knit Graffiti, mostly on Instagram, for a bit now and I love many of her brioche patterns. Last weekend I was at a LYS and was able to find some beautiful and soft merino yarn perfect for this hat. One color is a little bright and the other is dark, so I think they'll make a perfect contrast for brioche.
A little further down the list I have at least 3 more hats I could gift. One would be a sister hat. I struggle with picking out something that I think she'll like versus showing her some options to be sure I've got her style right... So far I'm leaning towards hats that are slouchy and maybe with lace, she lives in a warmer climate so cozy hats aren't really useful.
Sweet Clementine is a sport weight, crochet hat. I really like the stitch on this hat, which I believe is a bobble or popcorn type stitch. It's also just the right amount of slouch with a nice ribbed brim. Speaking of crochet, sport weight hats, the La Villa Lace Brim Slouch Hat is another good contender. This one has a different stitch on the brim that is a little like lace ribbing. The body of the hat is not really lace or openwork at all but it has nice slouch. I also found two knit hats that look good but a bit more complex. The Lacy Screech Owls Hat might not be very slouchy, but the lace is innovative... it looks like owls! While I really like this one, I need to remember I have time constraints... fingering weight and lace might not work. The DK hat, BUX might be more appropriate... while there is some lace the heavier weight yarn will make it a little faster. I also really like how the crown decreases form a star.
My other two possible hat recipients I imagine wanting somewhat plain and manly hats. Preferably with a foldable brim so that it is more likely to fit. The worsted weight Syndicate is a good pick, there are several sizes to choose from and you can't go wrong with a ribbed hat. Also made with worsted weight, the Pangani Hat starts with ribbing, but the body has a bit more detail between the rib. This one also has a few size options but with less built in length, I'd have to modify to get a folding brim. With a subtle difference to the 1x1 rib, the crush worsted weight hat is also a possibility. This one is a one-size design but with slouch that could be folded up. I think my best bet is going to be the Mount Rainier Hat. Also a worsted weight design, it is mostly a ribbed pattern but it transititions into knit at the crown decreases in the most interesting way! And... I just realized all my picks are knit. There are many more knit designs in the GAL but don't worry there are plenty of crochet designs I'll be sharing also!
There is a chance I'll be making a holiday hat per one of my children's request. I found a few options to chose from in the GAL. How about sheep santas? Fleece Navidad has you covered! It's a worsted weight hat made with stranded colorwork. This might be a little time consuming, and I'm more likely to appreciate the sheep, so that'll probably be for me. Another worsted holiday hat with a twist, Akua's Christmas Tree Pattern is a crochet tree hat! So cute and think of all the fun things one could add to go over the top... For a more traditional santa hat I found two options. Mrs. Claus Pointy Hat is written in multiple sizes for worsted weight yarn. While the name might make my son dismiss the hat, I think this is a good contender for all kids. Just in case, there is also the Festive Mood which has directions for DK and worsted weight along with many sizes. This one features a brioche brim and directions for the 'Jolly Elf' or 'beanie' style hat.
Since the GAL runs until the end of the year (just remember that the discount on purchases only runs until 11/28) there could be time for selfish knitting also! In that vein I've picked out some of my general favorite hats to share with you also. The Nina Z is an aran weight hat that utilizes BOTH knit and crochet! Said best by the designer "A simple crochet mesh transforms this basic hat into modern and stylish accessory." I definitely want one of these! The Mendia Hat is one I've looked at for a while now. The twisted ribbing detail gives it a little something special while it's still a fairly simple DK knit hat. Fleur De Love is another DK knit hat that features colorwork in the daisy stitch, I can envision this with many shades of purple! The sport weight hat, Hick City look so cozy with a good amount of slouch (or beanie optional!) and slipped stitches for use with at least two colors. If you've got the time, the fingering weight Persian Windows Hat would be fun with some left over yarns. The striping is so interesting with the special knit stitches used. The Caffe Latte worsted weight hat can convert to a cowl and still makes a super cute hat! I can't resist a cute brioche hat and with it's art deco and flapper style it's a must make for me. The Maddness hat will knit up quick with bulky yarn in two nicely contrasting colors. For a simple, slouchy crochet hat, look no further than the Bistro Beanie. I think this would be perfect for a variegated, indie dyed DK weight yarn to really show off the colors. For a little variation, I wanted to include the Oxford Headband. Crocheted in worsted weight yarn, this would be perfect for those messy bun days.
What will you be crafting for the GAL? Any of the hats here strike your fancy? Be sure to share on the Hat & Other Head Things thread so you can be in the running for PRIZES!
Monday, October 9, 2017
Spinzilla 2017!
Subscribe to:
Posts (Atom)